Overview
How Does It Work?
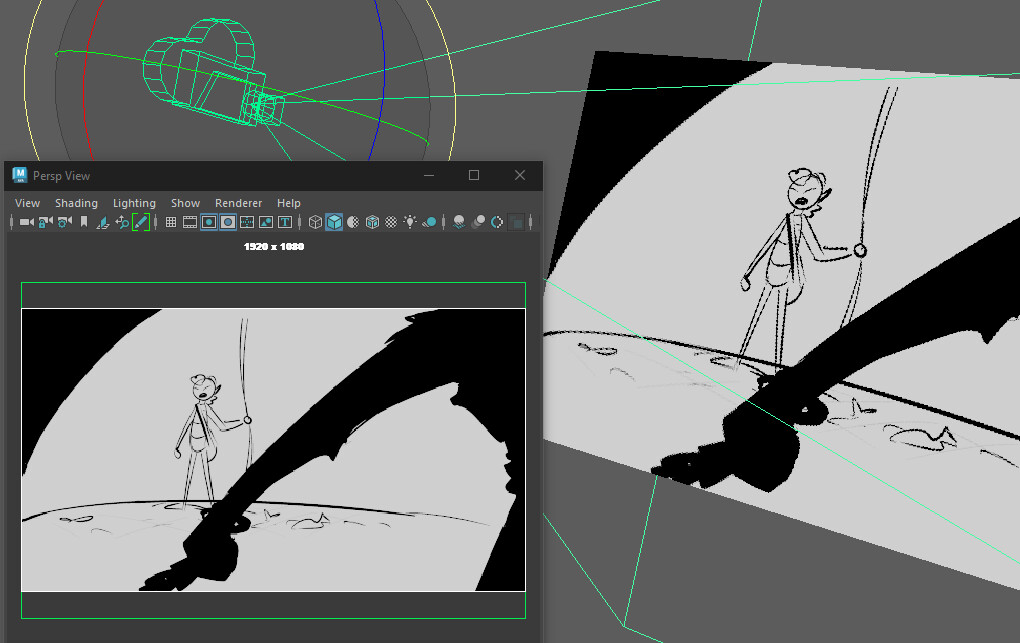
Media Plane is a plugin for Maya that offers a new node to play and scrub through video files directly upon a plane surface. The node works just like a video player, when you watch a movie. By loading a video file into the Media Plane node, the file is now being read from consistently, and buffered in memory for the selected resolution.
When the video file is being read from, it will become locked on disk and can't be changed unless its path is cleared form from the file path attribute, the node is deleted or scene is closed.
Media Plane is able to play the video file in real-time, reaching blazingly fast playback speed of more than 60fps, based on caching settings and video length.
Couldn't find what you were looking for?
Ask a question on our Discord or Email Support for any information.
Installation & License
Windows
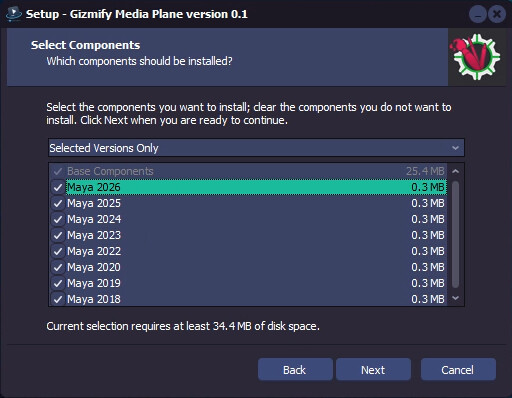
When launching the Media Plane installer, you'll be able to select the Maya version plugins
that you'd like to be copied to the install folder.
You can select All Plugin Versions or just the ones for the Maya versions you have installed (or want to use the plugin with.)
Base components will still be copied to the install folder to be used with all versions.
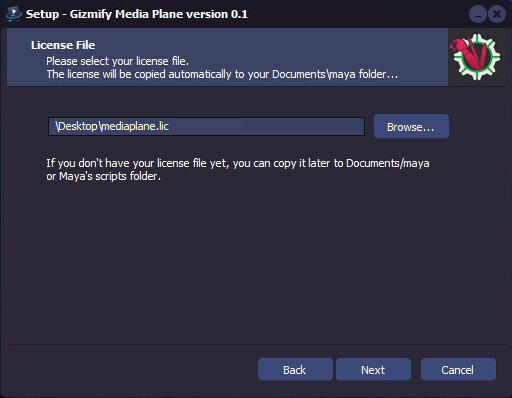
If you have a license file, you'll be able to select it during installation and it will be copied to your Documents/maya folder.
If you don't have your license file yet, or you want to store it in another location,
make sure to copy it yourself after the installation is complete.
You can copy it to Documents/maya or one of the following Maya's environment paths:
- MAYA_APP_DIR
- MAYA_PLUG_IN_PATH
- MAYA_SCRIPT_PATH
- PATH
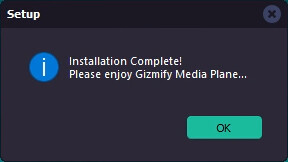
During installation, Some base components will need to be downloaded, so make sure you have a working internet connection when installing. After installation has completed successfully, you might need to restart your computer before using Media Plane.
Linux
Coming soon...
Couldn't find what you were looking for?
Ask a question on our Discord or Email Support for any information.
Getting Started
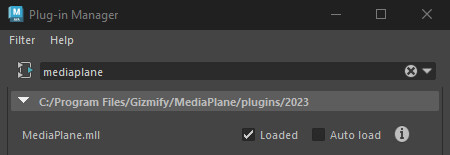
Load Plugin
To start, load the plugin in Maya's Plugin Manager.
By selecting Auto load, the plugin will load every time when Maya starts.
Note: Make sure that you've copied your license file to one of the paths described in
Installation & License,
so the plugin can locate it and start with full feature set. If you haven't copied the license, the plugin will start in trial mode.
MEL/Python Command
After the plugin is loaded, the easiest way to start using Media Plane is to run the following MEL command:
mediaPlane -camera {CAMERA-NAME};
Or Python command:
cmds.mediaPlane(camera="{CAMERA-NAME}")
Note: Make sure to replace {CAMERA-NAME} with the actual camera name you want Media Plane to follow.
All Command Arguments
camera (c) | String
Specifies the camera name to which Media Plane will attach automatically.
filePath (f) | String
Sets this file path to the newly created mediaPlane node.
noTime (nt) | Boolean
Don't connect time1 to the newly created mediaPlane node. Useful in case you want to control the frame attribute in a different way.
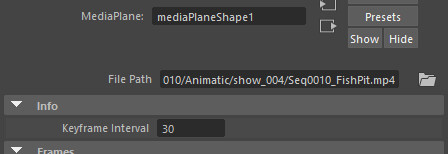
Open Video File
Once Media Plane is all set and follows your desired camera, select the mediaPlane node in your Outliner
and in Attribute Editor, browse file path to select the video or image file sequence you want (Yes, it works with image sequences too.)
At that point, you should see your video played by Media Plane, provided that your current frame is withing the video's frame range.
Couldn't find what you were looking for?
Ask a question on our Discord or Email Support for any information.
Video Formats
Media Plane supports the following video file formats, based on the default FFmpeg implementation used:
- .mp4 .mov .3gp .mkv .webm .avi .mpeg .flv
Video codecs supported include:
- H.264 (Recommended), MPEG-1 / MPEG-2, MPEG-4 Part 2, VP8 / VP9 and some others
Image Formats
Media Plane also supports the following image file formats, based on Maya native support:
- .iff .jpg .jpeg .png .tif .tiff .bmp .gif (single frame) .sgi .rgb .rgba .bw .pix .dds .hdr .exr .tga
Frame Caching
Media Plane implements its own caching system for video frames in order to make playback faster
when reading the video file from disk.
Video files are most often structured using keyframes that store an entire image for that frame
and subsequent frames that only store changes from the last keyframe.
The distance between each 2 keyframes in the video, we call a Block,
which is a unit that must be read in sequence from its keyframe, in order to get any given frame in it.
Using Media Plane's Caching Frames attribute, you can set the total amount of frames that you'd like Media Plane
to cache,
and thus speed up playback. The amount of frames you set, will be split into the nearest amount of Blocks and those Blocks
will be cached in memory for fast playback.
Example:
If the keyframe Interval attribute shows 72, meaning there's usually a keyframe in the video each 72 frames
and you've set Caching Frames to 300:
300 / 72 = 4.16 = 4 Blocks
Then 4 Blocks will be cached in memory.
Therefore, if you're experiencing slower playback, check that the Caching Frames value is greater
than the Keyframe Interval by a few fold (x5 should do the trick).
Alternatively, if you want to save on memory,
you can lower the Caching Frames value at the cost of potential performance.
If you still need more frames, you can save on memory instead by lowering the Caching Resolution attribute to Half or Quarter, sacrificing image quality instead of frame count.
Couldn't find what you were looking for?
Ask a question on our Discord or Email Support for any information.
Features
The Media Plane node offers various features and attributes depending on your license tier:
Attributes
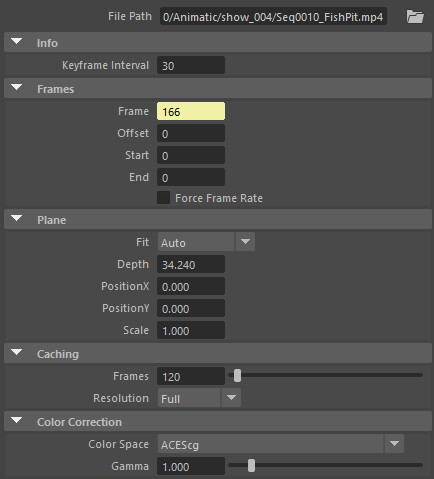
Keyframe Interval
Simply shows information of how many frames the keyframe interval is in the video file.
Most compressed video formats are structured in a way that a keyframe contains an entire image for a given frame
and following frames only contain the changes from that keyframe until the next keyframe.
This allows the file to be smaller and you save on disk space when using Media Plane.
Generally, the smaller the keyframe interval, the larger the file will be on disk and less caching memory will be required to cache it. Likewise, the larger the keyframe interval, the smaller the file will be. Recommended value when creating the video file is around 72, but your mileage may vary.
Offset
Frame offset in the video file in relationship to Maya's timeline.
Start
Start playing the video only from this frame number.
End
Cut off the video after this frame number.
Force Frame Rate
By checking this, Media Plane will read the video file based on Maya's frame rate.
For example: If a given video is 30fps (29.97fps) and Maya is set to 24fps,
then Maya will treat 1 second in the video as 24fps and when you scrub to frame 24 on the timeline,
it will show you frame 29 (not 24.)
Fit (Auto, Horizontal, Vertical)
This decides how the Media Plane is to be fitted onto the camera.
Usually Auto is all you need to set it to, as it will consider the camera setting on its own.
But in some cases, switch it to Horizontal or Vertical to see better desired results.
Depth
In Maya units, how far (how deep) should the Plane be in 3D space, considering other assets in your scene.
When setting it farther or closer, the Plane will automatically scale to remain fitted to the camera.
PositionX
Horizontal offset to move the Plane by in your viewport.
PositionY
Vertical offset to move the Plane by in your viewport.
Scale
Plane local scale
Caching Frames
Sets how many frames will be cached in memory when reading the video file.
Adjust this to a larger value if your video's keyframe interval is larger than this default value.
Otherwise, default value should be plenty.
Note: You may also set this value lower to conserve memory on your computer,
but if your Caching Resolution is set to less than Full, default value should be fine.
Caching Resolution (Full, Half, Quarter)
How large should the cached frames be in the viewport.
Full = Best quality, highest memory usage
Half = 2x downscaled quality, moderate memory usage
Quarter = Worst quality, lowest memory usage
Color Space (Requires Maya 2022+)
Set a color correction transform for the video.
Gamma
Adjust the Media Plane image gamma correction.
Base Transformations
While having Position and Scale attributes, Media Plane also has a basic transform that can be used to translate, rotate and scale the Plane. With that said, it is recommended to use the attributes as described above, instead. That way, the Plane is guaraneed to follow and stay fitted to the camera properly. But... up to you! 🙂
Limitations
When running Media Plane in Trial mode:
- Playable frame range will be limited to 24 frames.
- Up to one node can be created in a Maya scene.
- Basic node features only are available.
Couldn't find what you were looking for?
Ask a question on our Discord or Email Support for any information.
Troubleshooting
The installer adds the installation module path to the MAYA_MODULE_PATH environment variable, allowing Maya to find the Media Plane plugin and scripts, but the path is refreshed upon a restart.
Make sure that the license file is named mediaplane.lic
Also, make sure that the video selected has the frame range you're asking for and the video file itself isn't corrupted.
Use the Depth attribute to set the Plane's distance from camera to a position where it doesn't clip anymore. If your camera has animation, make sure to animate the Depth attribute as well to remove clipping.
Additionally, make sure that your video isn't too low-res. Video resolution of 480p or lower would look pixelated by their nature.
Couldn't find what you were looking for?
Ask a question on our Discord or Email Support for any information.
Support
Media Plane comes with various tiers of support based on your license.
Tier-specific Discord channels and support e-mail are available to you
based on the license you've chosen.
To particiapte in those channels, you will need to use the designated Discord invite
that gets sent to your e-mail upon a successful license purchase.
If you had already joined our Discord at that point, leave for a brief moment
and use the new invite to Re-Join.
Alternatively, send us an e-mail
and we will add you to the correct channels.
Couldn't find what you were looking for?
Ask a question on our Discord or Email Support for any information.
Stay in Touch
Join Insider Updates & Offers
Early access and Discount offers, news and updates about Gizmify animation tools.
You can unsubscribe at any time. Learn more in our Privacy Policy